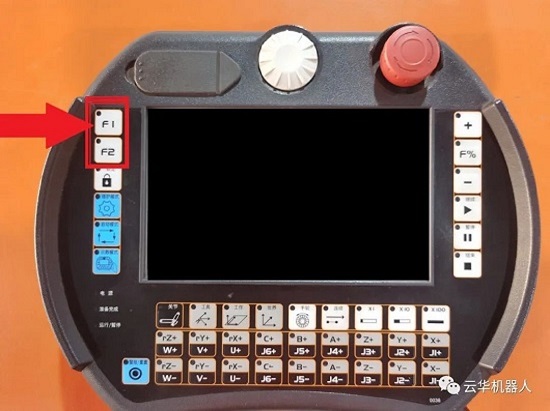
In previous issues, we have introduced various aspects of Yooheart intelligent robots and the general situation of our company. Today, this issue will bring you to systematically learn the operation of Yooheart intelligent robots. To understand how to operate the robot, we have to take it step by step. We must first understand the buttons of the teach pendant. Please see the picture below, according to the understanding of the parts of the picture.
1.F1 F2
These two buttons are defined by the user according to their later needs. The specific operations are as follows:
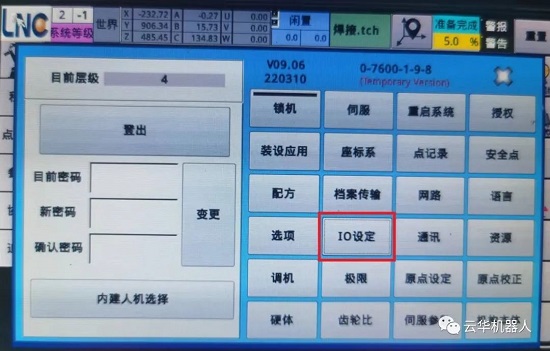
Step 1: Find the IO settings in the system permissions
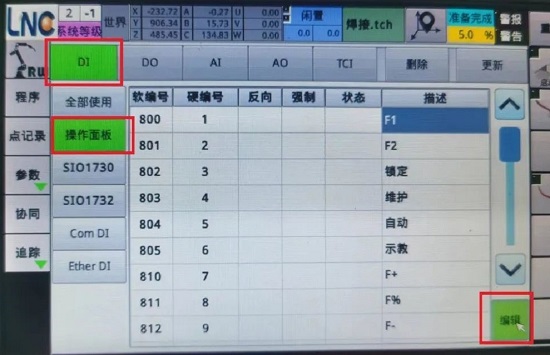
Step 2: Click [DI] -> [Operation Panel] -> [Edit] to enter the function editing of the opposite F1 and F2 buttons
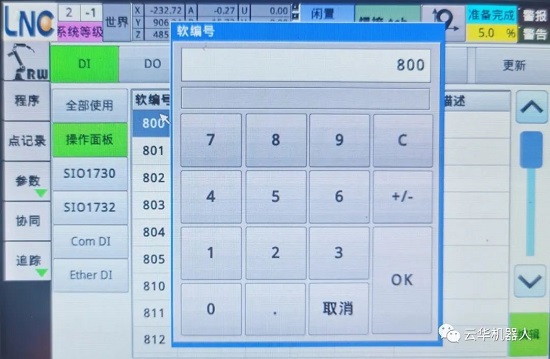
Step 3: Click the soft number corresponding to F1 and F2, and enter the soft number of the function to be implemented. (PS: the soft input number has been used by other functions, it may make the original button change the function ineffectively, so it is recommended to communicate with professionals fully; the function of the soft number needs to be edited and realized by PLC)
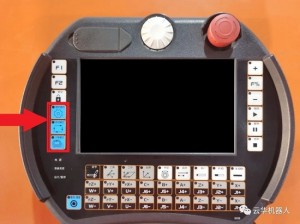
2. Locking

Screen lock function
When we press this button, the teach pendant will display the following screen
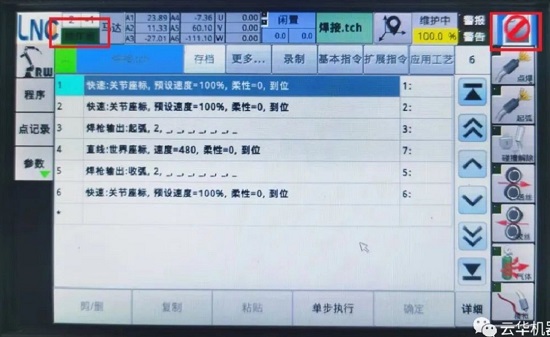
The original system permission level in the upper left corner will become the initial operator permission level, and a red prohibition sign will appear in the upper right corner. At this time, you cannot perform any operations on the teach pendant.
How to get rid of this state?
First click on the prohibition sign in the upper right corner and the following screen will appear. At this point, enter 0, and then click OK to unlock the teach pendant and proceed to the next step
3.Maintenance mode, automatic mode, teaching mode:
a: Maintenance mode: control the operation of a single motor. When the motor is rotated, it can still move when the preparation is not completed, and when the axis exceeds the limit, it can still move in the direction away from the limit. It is usually used in the configuration period.
b: Automatic mode: used to start the program, or operate specific actions in each page. In this mode, the robot operates according to the type of the coordinate system, and cannot enter the automatic mode until ready.
c: Teaching mode: It is used to operate the robot during programming. It can move according to the direction of the coordinate system of [World], [Work], [Tool], and [Joint].
4. +、F%、-、start, pause, end:
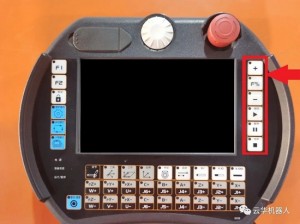
a:+, F%, -,: Speed percentage setting, adjust the speed percentage during automatic operation in automatic mode. "+": increase machine percentage speed; "-": decrease machine percentage speed; "F%": half of the current speed ratio, that is, 0.5% at 1%, 5% at 10%, and 50% at 100% .
b: start, pause, end: in automatic mode, start, pause, end the running program
5:Joint, Tool, Work, World:
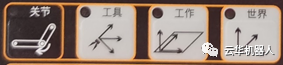
The selection button of the coordinate system, different buttons will make the movement trajectory of the machine different, select the relevant coordinate system according to the needs
a: Joint coordinate system: Determined according to the definition of the direction of joint rotation
b: Tool coordinate system: Determined according to the movement direction of the assembled tool (fixture)
C: Working coordinate system: Determined according to the working surface required by the external workpiece
d: world coordinate system: determined according to the machine base as the center origin and the direction of tool movement
Post time: Jul-20-2022


